Disclosure: Privacy Australia is community-supported. We may earn a commission when you buy a VPN through one of our links. Learn more.
How to Speed Up Your Internet Connection

By
Will Ellis
-

-

-

Last Updated on January 9, 2024
If you’re old enough to remember the days of dial-up modems, then you recall that websites took forever to load. Back then, all of the waiting was just a part of the experience. The technology for faster browsing was still being developed.
Things are different today, but this doesn’t mean that you can’t be plagued with slow Internet speeds. It’s much more annoying to have to deal with this problem now when people are accustomed to websites that load in less than the blink of an eye.
These days, when the Internet is moving slowly, it doesn’t necessarily mean that you have a bad connection. It may be that your ISP has placed a cap on the speed that your connection is capable of achieving. If you don’t have antivirus software, this also could leave you open to incredibly slow web traffic.
Slowdowns may be caused by using an out-of-date version of your antivirus software too. A device that’s loaded down with malware is not capable of speed. There’s even a possibility that your ISP’s Domain Name Server may have issues.
What To Do if You Have a Slow Internet Connection
Before we dive into all the ways to make your internet faster, we need to clear the air. If your ISP is offering slow connections, nothing you do will make any difference.
So, before reading through this guide and making all the internet speed tweaks, the first step is to make sure you’re not being throttled.
Contact your ISP to ask if there any limits on your connection. If not, ask them if a higher level of service is available for upgrade. If you have a choice of ISPs, then you may want to compare the competition.
Your Connection Is Still Slow
If you’ve contacted or changed your ISP and they say that you should be enjoying super-fast connections, then you may have to look for other issues.
Start with your antivirus software to ensure that you don’t have malware running on your computer. According to Heimdal Security, background malware can significantly slow down your Internet speed.
Most antivirus software like Avast, Norton, and MalwareBytes can effectively find and clear malware (we recommend using MalwareBytes because it’s considered the best at finding and eliminating malware.)
No one should be online without basic protection against viruses. Antivirus software packages can examine your system to find and kill existing viruses as well as prevent new ones from being introduced.

If you’re concerned about things like malware and adware, you can get software that detects and eliminates these problems too.
This doesn’t have to be you.
Once these software packages are installed and run, you’ll probably notice an immediate improvement in browsing speed.
However, this doesn’t mean that your work is done. If you don’t want to pay for tools, check out some of the best free antivirus programs out there. (Again, we would recommend avoiding free tools and paying the small amount of $ for a trusted solution like MalwareBytes.)
You may need to configure a new DNS server. If that sounds complicated, don’t worry. It’s easier than it sounds, and no advanced degree in computing is required.
Defining DNS
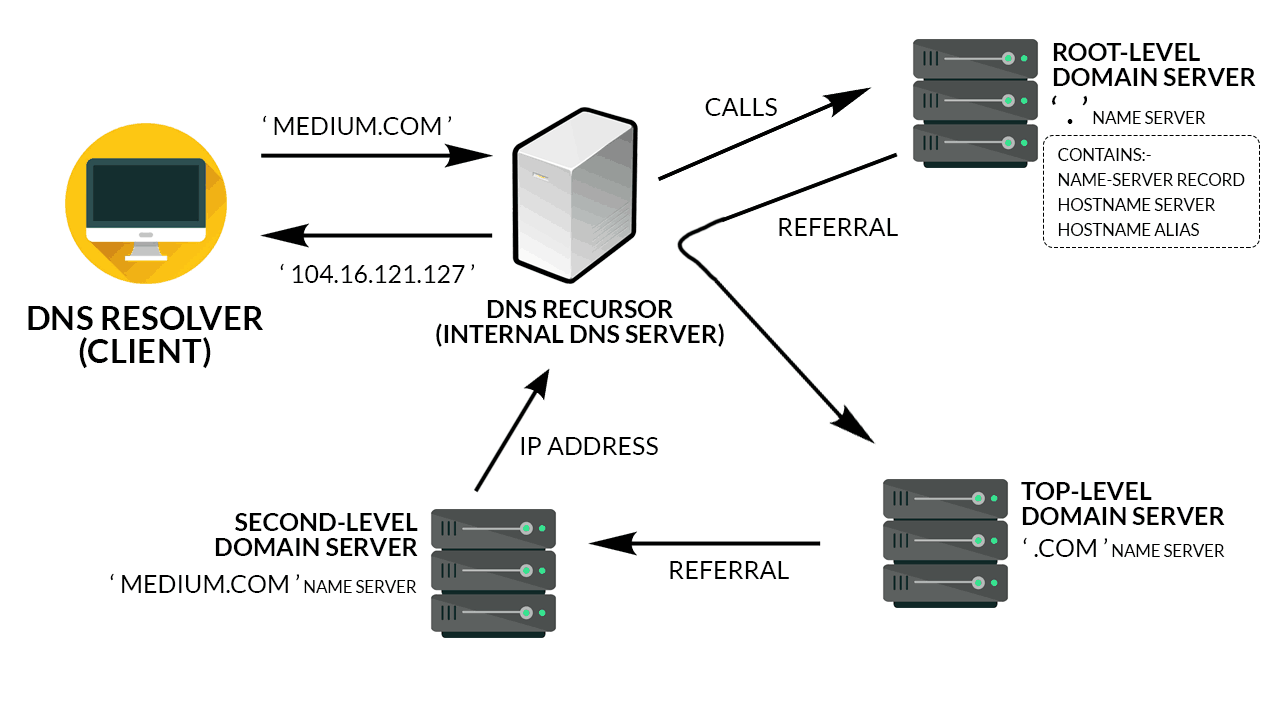
DNS is an acronym for “Domain Name Server.” It’s the server that’s responsible for converting an easy-to-read domain name like Facebook.com or Amazon.com into a numeric IP address.
It takes a human-readable domain name and turns it into a chain of numbers that computers understand.
While a DNS is designed to help people navigate the Internet so that they can visit websites, it’s also responsible for preventing access to certain IP addresses that have been blocked.
You’ll get a “No Access” message if you try to watch an online video that is restricted from your location.
How Does DNS Work?
IP addresses are like a language that computers and servers use to communicate and to send data to the proper location. You enter a domain like amazon.com, and then your DNS searches for it. The receiving name server then communicates with your DNS regarding the domain’s address.
The DNS provides this address to the browser. Your browser can then load the web page.
The entire process takes longer to describe than it does to occur. When things are running smoothly, this is accomplished in less time than it takes for you to blink.
Your device and your router have network settings that determine which DNS you use. Typically, it’s your ISP that decides which DNS you use.
This isn’t necessarily the fastest DNS, which means you should search for an alternative.
Choosing a DNS
You don’t have to be a techno geek to find a better, faster DNS. Google offers a tool called namebench that tests your existing DNS and looks for other available options.
You can run namebench on your device without changing any of your settings, so if you discover that current DNS is the best available, you haven’t lost anything. Google Namebench also is free.
How to Get Google Namebench
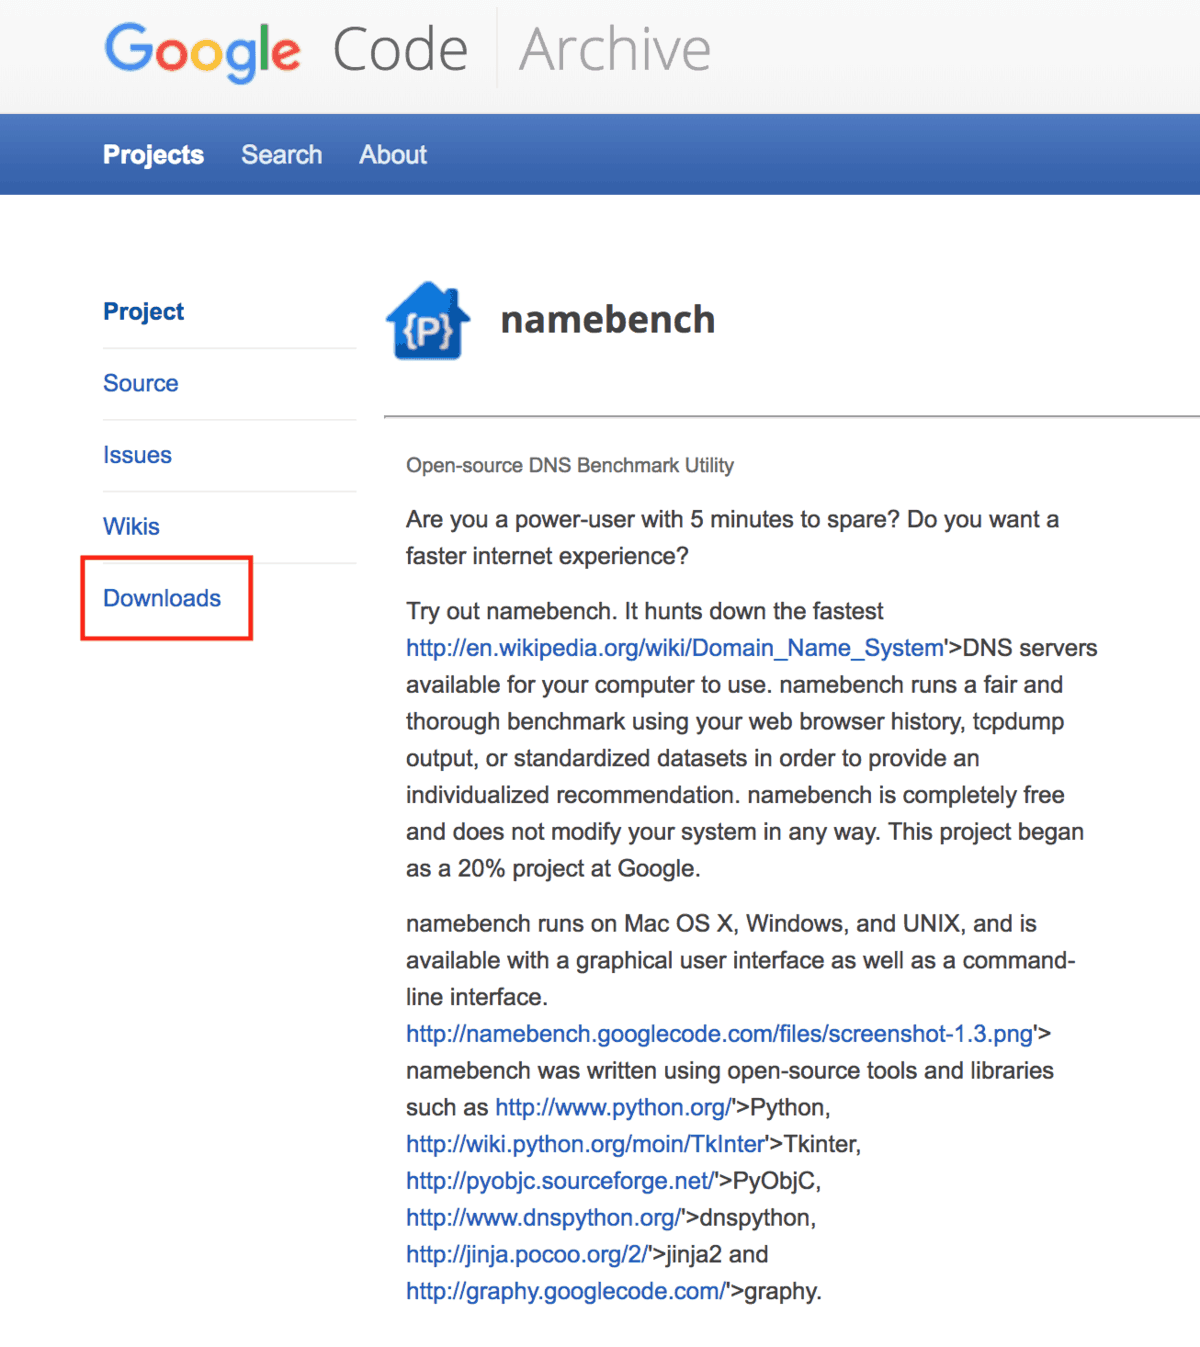
Visit Google’s namebench webpage at https://code.google.com/archive/p/namebench/downloads. On the left-hand side of the screen is a sidebar with the selection “Downloads.” Click on it.
Locate the latest version of your operating system. The latest versions of namebench are located at the top.
Click on the blue file name to the left, keeping in mind that there are different options for Mac and Windows.
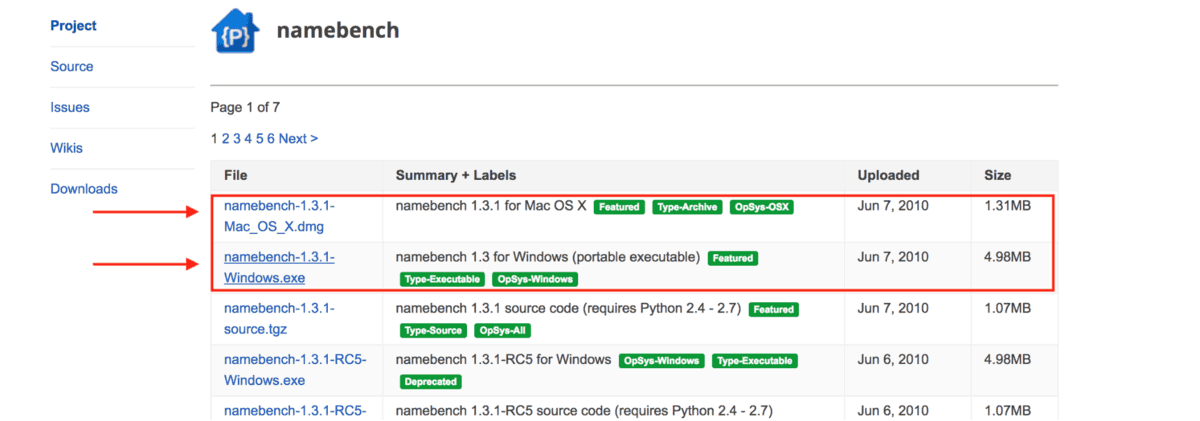
Clicking on the blue file name takes you to a new URL. The download begins automatically.
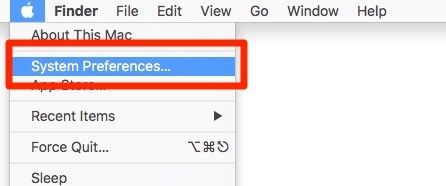
Because of their security settings, some Mac users may get a warning that namebench cannot be opened. However, this is a trusted and reliable program, so it’s acceptable to bypass this notification. If this is a repeated issue, take these steps:
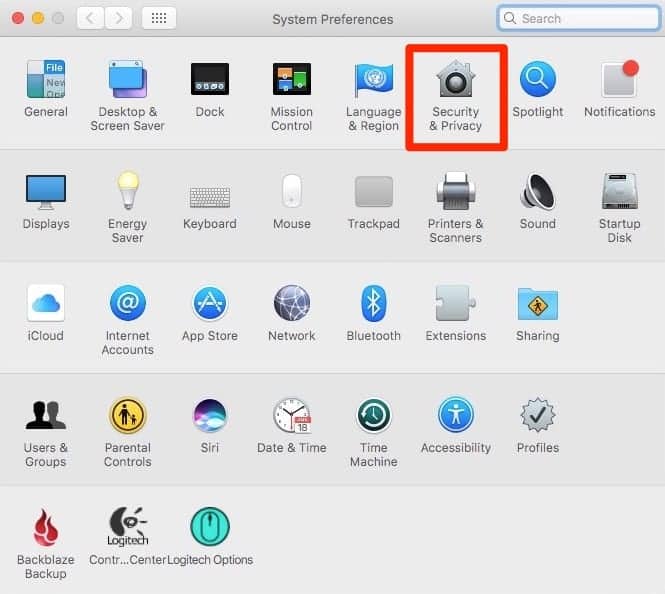
- Find “System Preferences” under the Apple icon.
- Hover over the “Security & Privacy” icon.
- Click on the button that says “Open Anyway“.
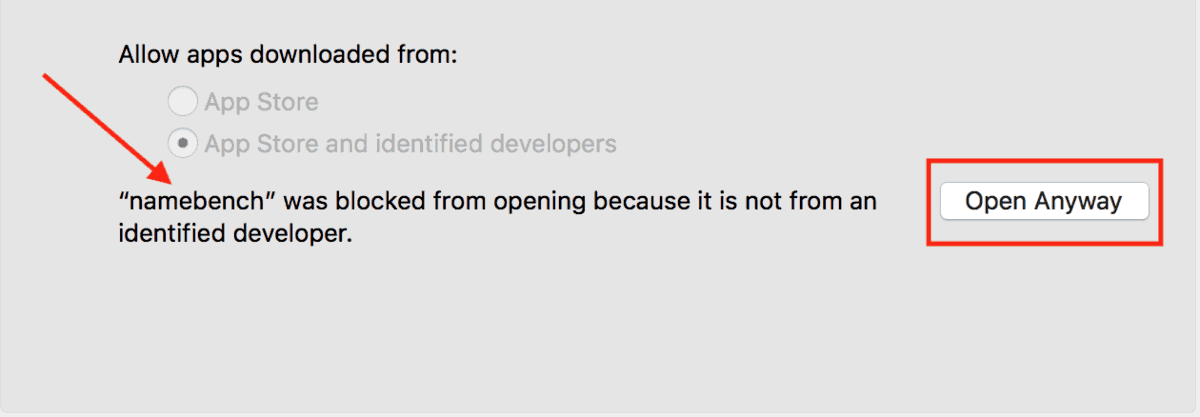
- Enter your account password when prompted.
- Continue with installation of namebench.
Configuring Namebench
With installation complete, it’s necessary to do some configuration. The configuration options are identical for Mac and Windows users.
The first bar on the screen displays the IP address of your current DNS. This field is autofilled by the program.
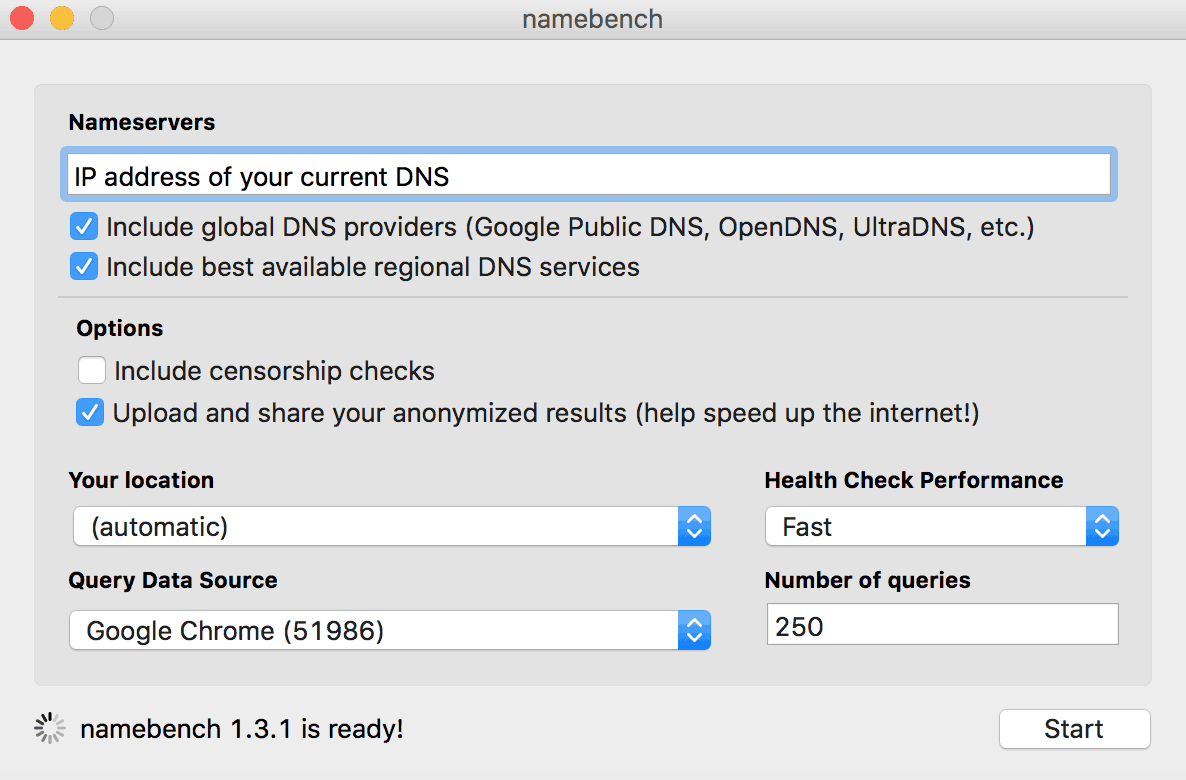
Below this bar, you’ll see two options. These are: “Include global DNS providers” and “Include best available regional DNS services.” These are namebench’s primary search functions. You have the option of unchecking either of these.
However, leave both selected because this means that you are granting the program permission to check for the best possible DNS server.
Below this section is a second section entitled “Options.” These secondary choices make it possible for you to include censorship checks if you want to block specific URLs.
With this option, you can filter DNS servers and line them up according to how powerful they are at blocking unwanted websites. If you’re planning on hosting a DNS server, or otherwise worry about your security, you might want to read up on some encryption guides.
The second option doesn’t improve your odds of finding a better DNS, but it may be helpful nonetheless. This is the “Upload and share your anonymized results” button. Checking this box sends your anonymous data back to the people who develop namebench, which enables them to improve the program.
In the next section, you have the option of selecting your location. It’s advisable to leave this section as “automatic,” since the program is able to identify your location via your device’s IP address.
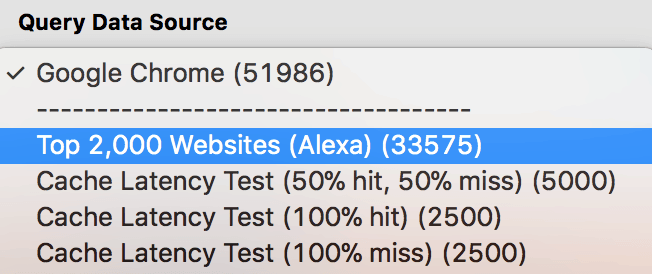
Query Data Source
In the “Query Data Source” section, choose your browser. If you’re sensitive about privacy or if you mainly surf in incognito mode (though you still might be at risk of browser fingerprinting), then it may be sensible to choose “Top 2000 Websites (Alexa)” instead.
The next box is labeled “Health Check Performance.” The drop-down menu contains two options. One is “fast;” the other is “slow (unstable network).“
Most users are likely to choose fast. However, if you regularly deal with timeouts during your Internet connection, then it’s wise to choose slow. This parameter will check anywhere from 10 to 40 servers, including proxy servers, depending upon bandwidth.
The last option that you can set is for “Number of queries.” What this means is, how many times do you want each DNS to be queried during your test. The default setting is 250. There is rarely reason to alter the default entry. If you do have a really slow network, then you may want to reduce the number of queries to 100 or 150.
Hit the “Start” button so that namebench can go to work. It usually completes its task in about two minutes.
Reviewing Namebench Results
Namebench automatically opens a new tab when it gets done with its test. The data may look something like this:
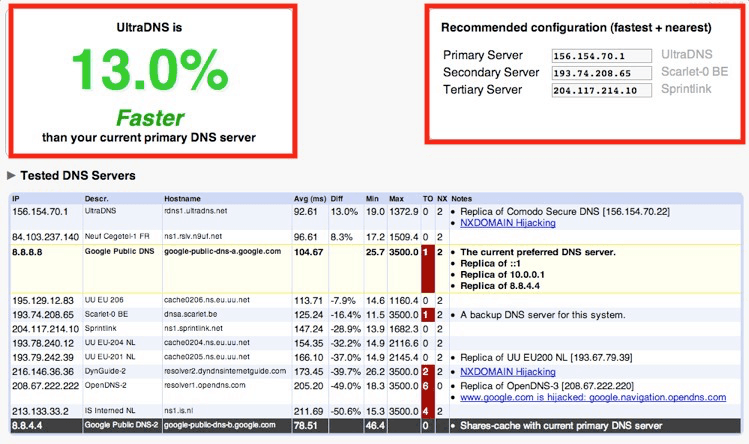
The main box in the upper left-hand corner of the screen encapsulates the most important information by telling you which DNS server is the fastest available to you compared to your current DNS server.
Next to this box is another box showing the precise configurations you should use for ultimate performance.
Below these boxes, you’ll see a list of all of the DNS servers that were tested. The list includes the performance numbers that each competitor put up.
Your current DNS will be identified with a yellow box.
Reconfigure Your Router Settings
Namebench has provided you with what you need to speed up your browsing. Now, you need to reconfigure your router settings.
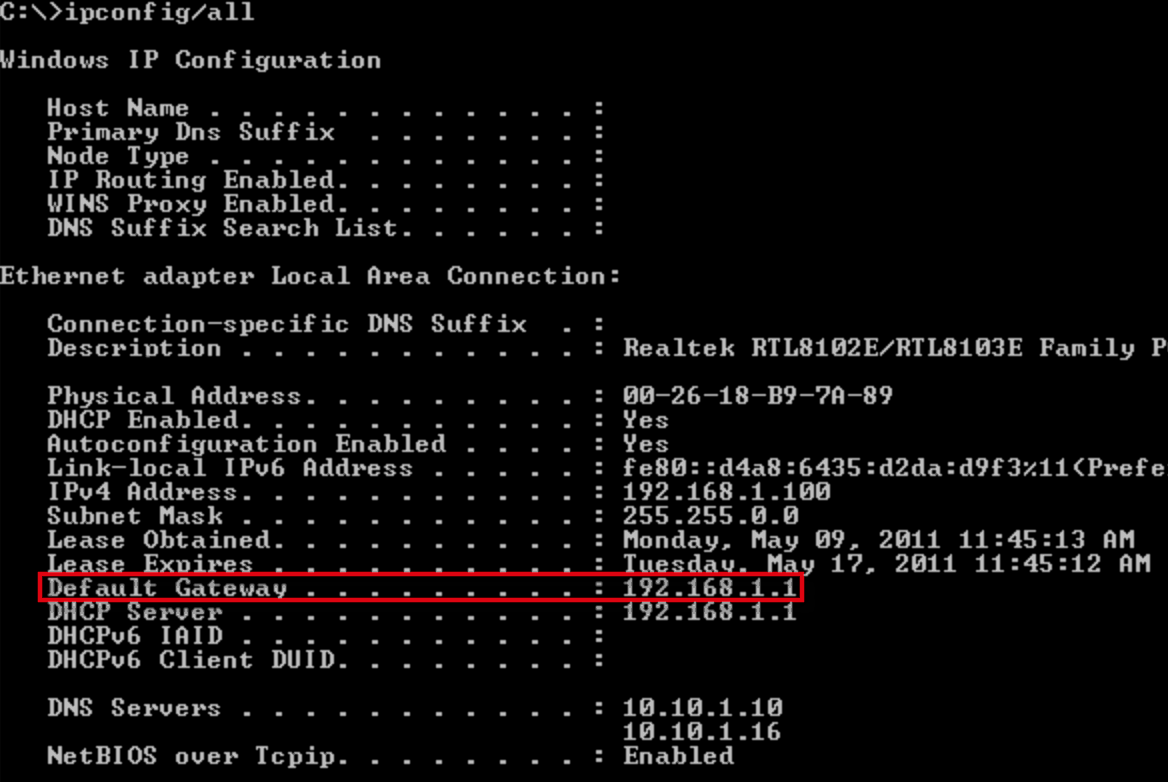
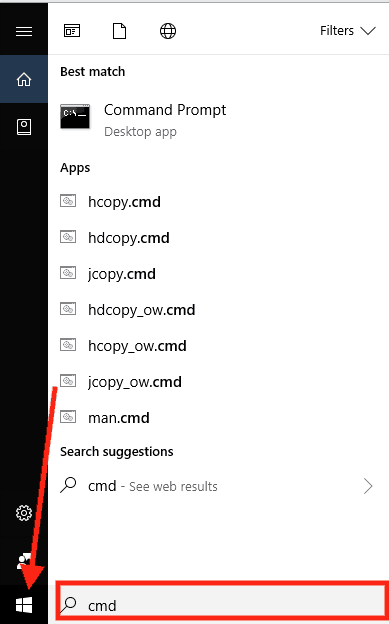
First, look up the IP address of your router. If you’re running Windows, click on Start, then type “cmd” in the task bar. Click on the icon.
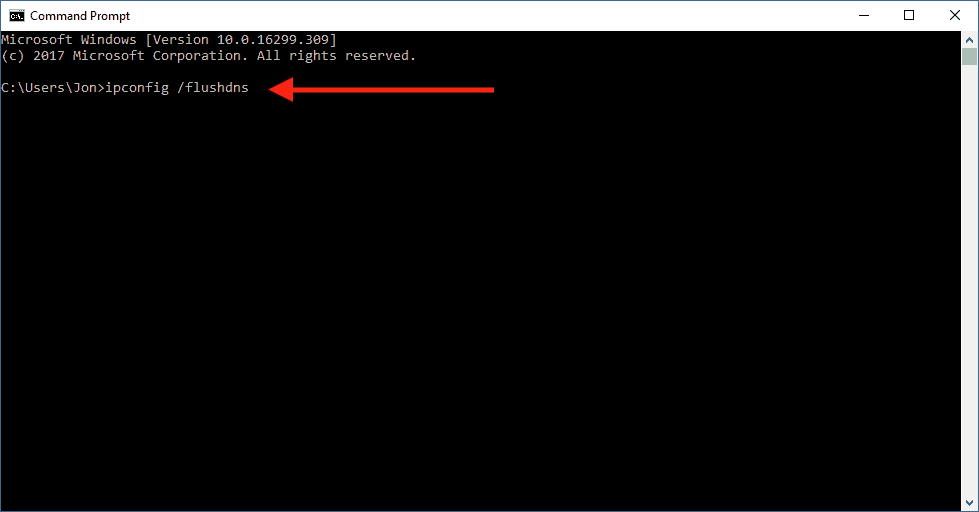
Type ipconfig/all, then hit enter.
In the resulting list, look for the “Default Gateway” entry. The sequence of numbers to the right is your IP address.
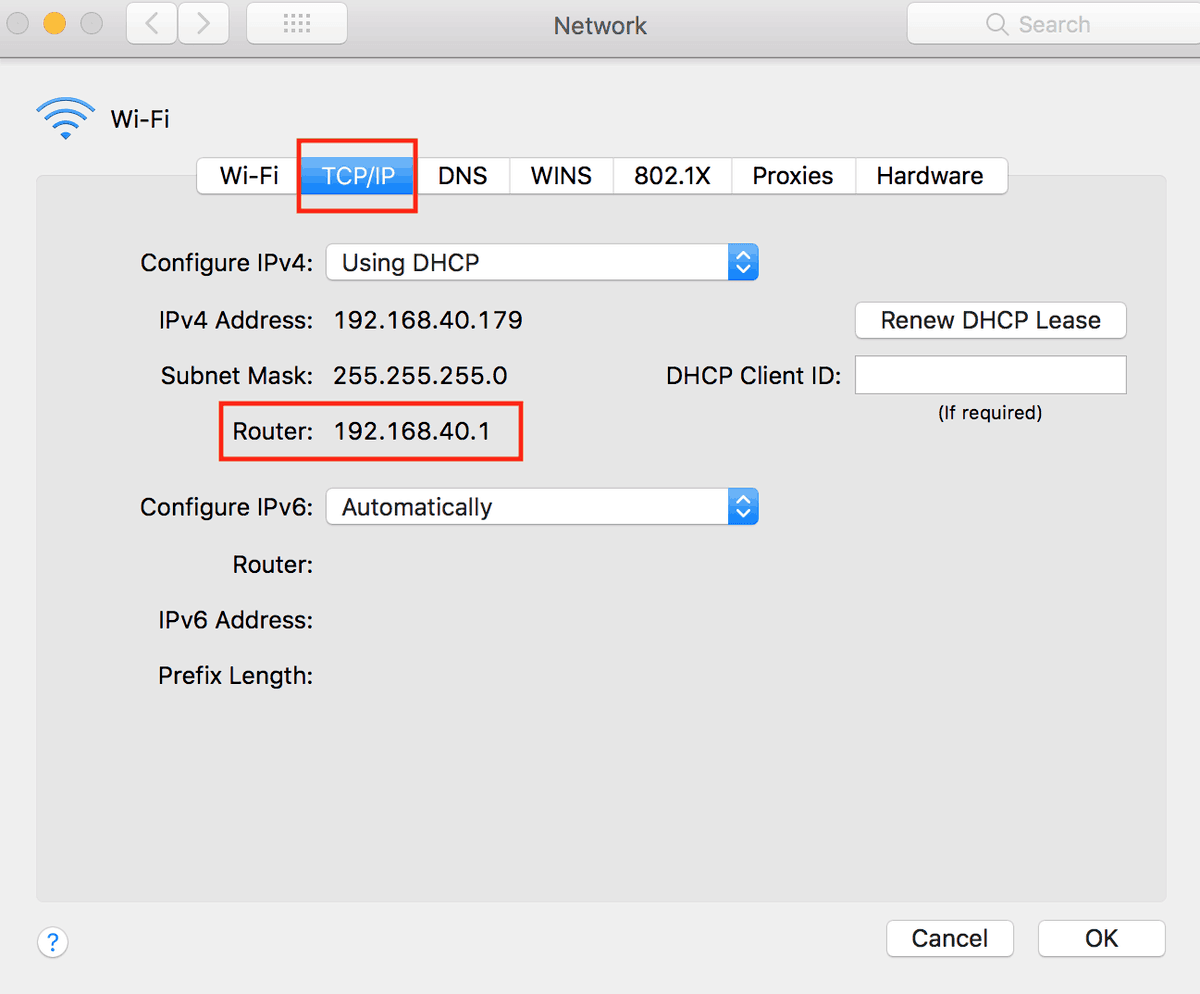
Mac users have a different process that begins with “System Preferences” and then “Network.” Check which network is selected, and then hover over “Advanced” momentarily. A tab opens. On it, locate “TCP/IP.” After “Router,” you’ll see a series of numbers that is your IP address.
Now it’s time to enter your IP address into your browser. You may be requested to enter your router’s username and password.
In your router’s main dashboard, locate either “Basic Settings” or “Network.” Click on one of these selections. This displays primary and secondary DNS addresses. Take a screenshot of these numbers or write them down. This enables you to go back to your default settings if necessary.

Here’s where you need the configuration settings that namebench generated. Replace the primary and secondary DNS addresses with the addresses provided by namebench.
Save your changes and log out of the router dashboard.
Clearing Your Old Cache
Every DNS creates a cache on your server. This speeds up essential functions, such as keeping certain data for websites that you repeatedly visit. If you delete your old cache, it can really speed up your performance.
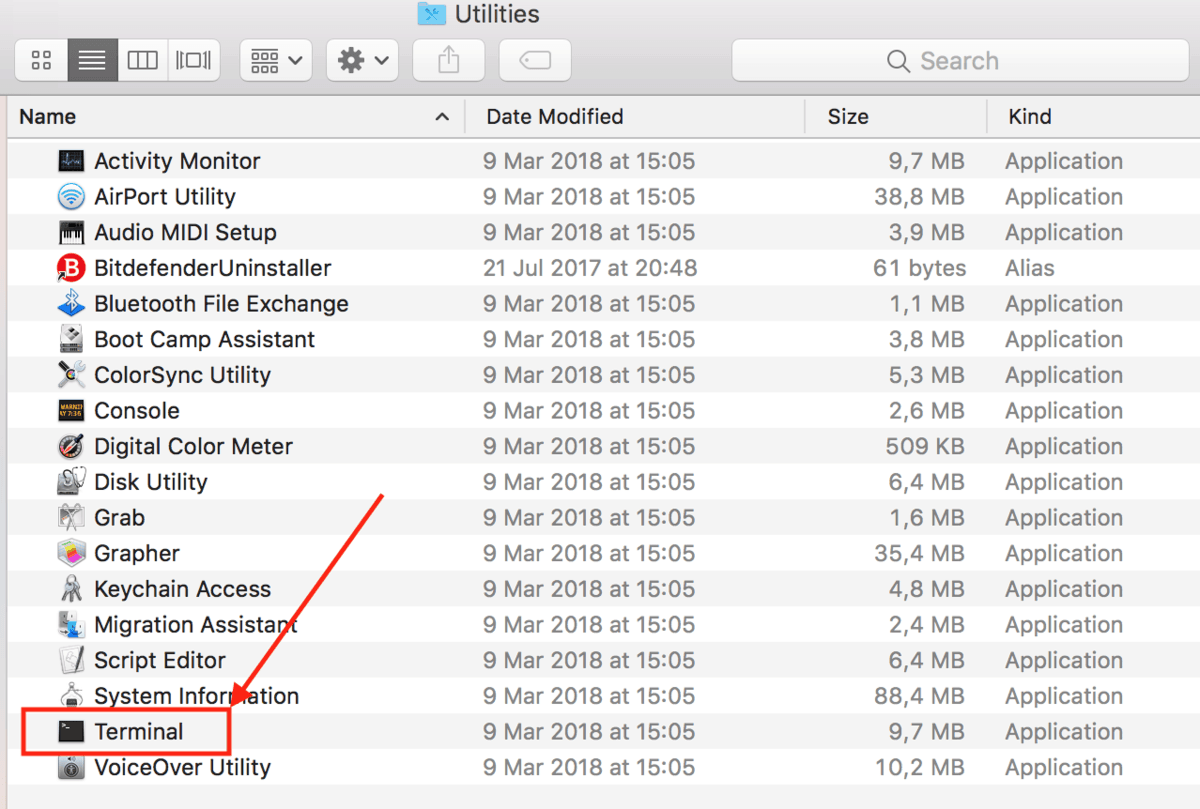
To do this, Mac users click on “Finder,” then hover over “Applications.” Scroll down to “Utilities,” then locate “Terminal.” Click on “Terminal.” Enter “sudo killall -HUP mDNSResponder” or “sudo dscacheutil -flushcache” to empty the old cache.

Windows users click on “Start” and then enter cmd in the task bar.
Click on the Windows icon, and then enter this text, “ipconfig /flushdns.” Hit enter, and the old cache is emptied.
You’re now prepared for lightning-fast browsing with a great VPN of your choice. If you’re on a tight budget, check out the best free VPN list we have carefully scrutinized and filtered. Otherwise, let us make a few recommendations for you today, check out our review of NordVPN or Surfshark. You won’t be disappointed.
You May Also Like: